Getting started with Blisk
Learn about key features and settings: User interface, Devices, Auto-refresh, URL and Scroll sync, Screenshots, Screen recorder, Notifications, and more
Introduction
Blisk is the first developer-oriented browser with built-in devices that runs on your desktop and is available for Windows, macOS, and Linux. It provides teams and freelancers with a workspace to develop and test modern web applications twice faster.
Blisk v.14
You can use Blisk as a regular browser to look for something across the web (Browsing mode) or you can use a workspace for web development (Developer Mode).
Supported web applications
Blisk supports any kind of web applications: Whether it is in production state (public website or web application), or development / staging state (local website, local web application, local hybrid application). Native mobile apps for iOS, Android, iPadOS are not supported at the moment.
Blisk also natively integrates with your local web server: Simply start your local web server and paste your local address into the address bar (e.g. localhost). If you work in Visual Studio - set Blisk as your default web browser and press F5 or CTRL + F5. This will start your local website in Blisk automatically.
Single-page applications of any kind (e.g. based on Angular, React, Meteor, Ember, Backbone, and VueJS) are supported as well.
Supported languages
At the moment, Blisk application supports English language only. The other localizations are not available.
First steps
- Download the latest version of Blisk
- Create a Blisk account
- Log into your account in Blisk browser
Download Blisk
Being a desktop application, Blisk supports different operating systems from major vendors: Windows, macOS, and Linux-based systems. The installers for Windows and macOS are protected with Digital code sign certificates, providing the highest level of security. We ensure that our software development is secure and assets of our clients always remain protected.
Windows
Blisk supports Windows 11/10 or Windows Server 2016 or later (64-bit version).
macOS
Blisk supports macOS Catalina 10.15 or later for Intel chip and M1-M5 chip (Apple Silicon).
Download Blisk for macOS (Intel chip)
Download Blisk for macOS (M1-M5 chip (Apple Silicon))
Linux
Blisk supports 64-bit versions for Debian/Ubuntu and for Fedora/openSUSE.
Download Blisk for Debian/Ubuntu
Download Blisk for Fedora/openSUSE
Update Blisk
We constantly update the software with an average release cycle of 2-3 months. The updates include new features, new devices, platform updates, bug fixes and security patches. As soon as new update becomes available, Blisk notifies users with the in-app notifications and via email.
Visit the Update portal to update Blisk for your OS. Every version offers a short overview on how to update Blisk for your operating system. If needed, you can request an offline installer from our Support team.
The Windows version offers silent update - the application installs update itself with the application relaunch after the permission from the user.
macOS and Linux-based versions require a few clicks to update the software. The feature of silent update on macOS is currently in progress.
Tutorials and Demos
Please refer to our Video tutorial with a Blisk demo describing the workflow and main features that you will be using in Blisk.
Workflow
With Blisk, you can do a variety of tasks to get things done faster, whether you need to browse the web or build and test web applications. Use Browsing Mode to look for something across the web or start Developer Mode when you need to develop and test your website.
Browsing Mode
Like other browsers, Blisk uses an address bar (Omnibox) to navigate across the web. Type a URL or search query into the address bar to view web content.
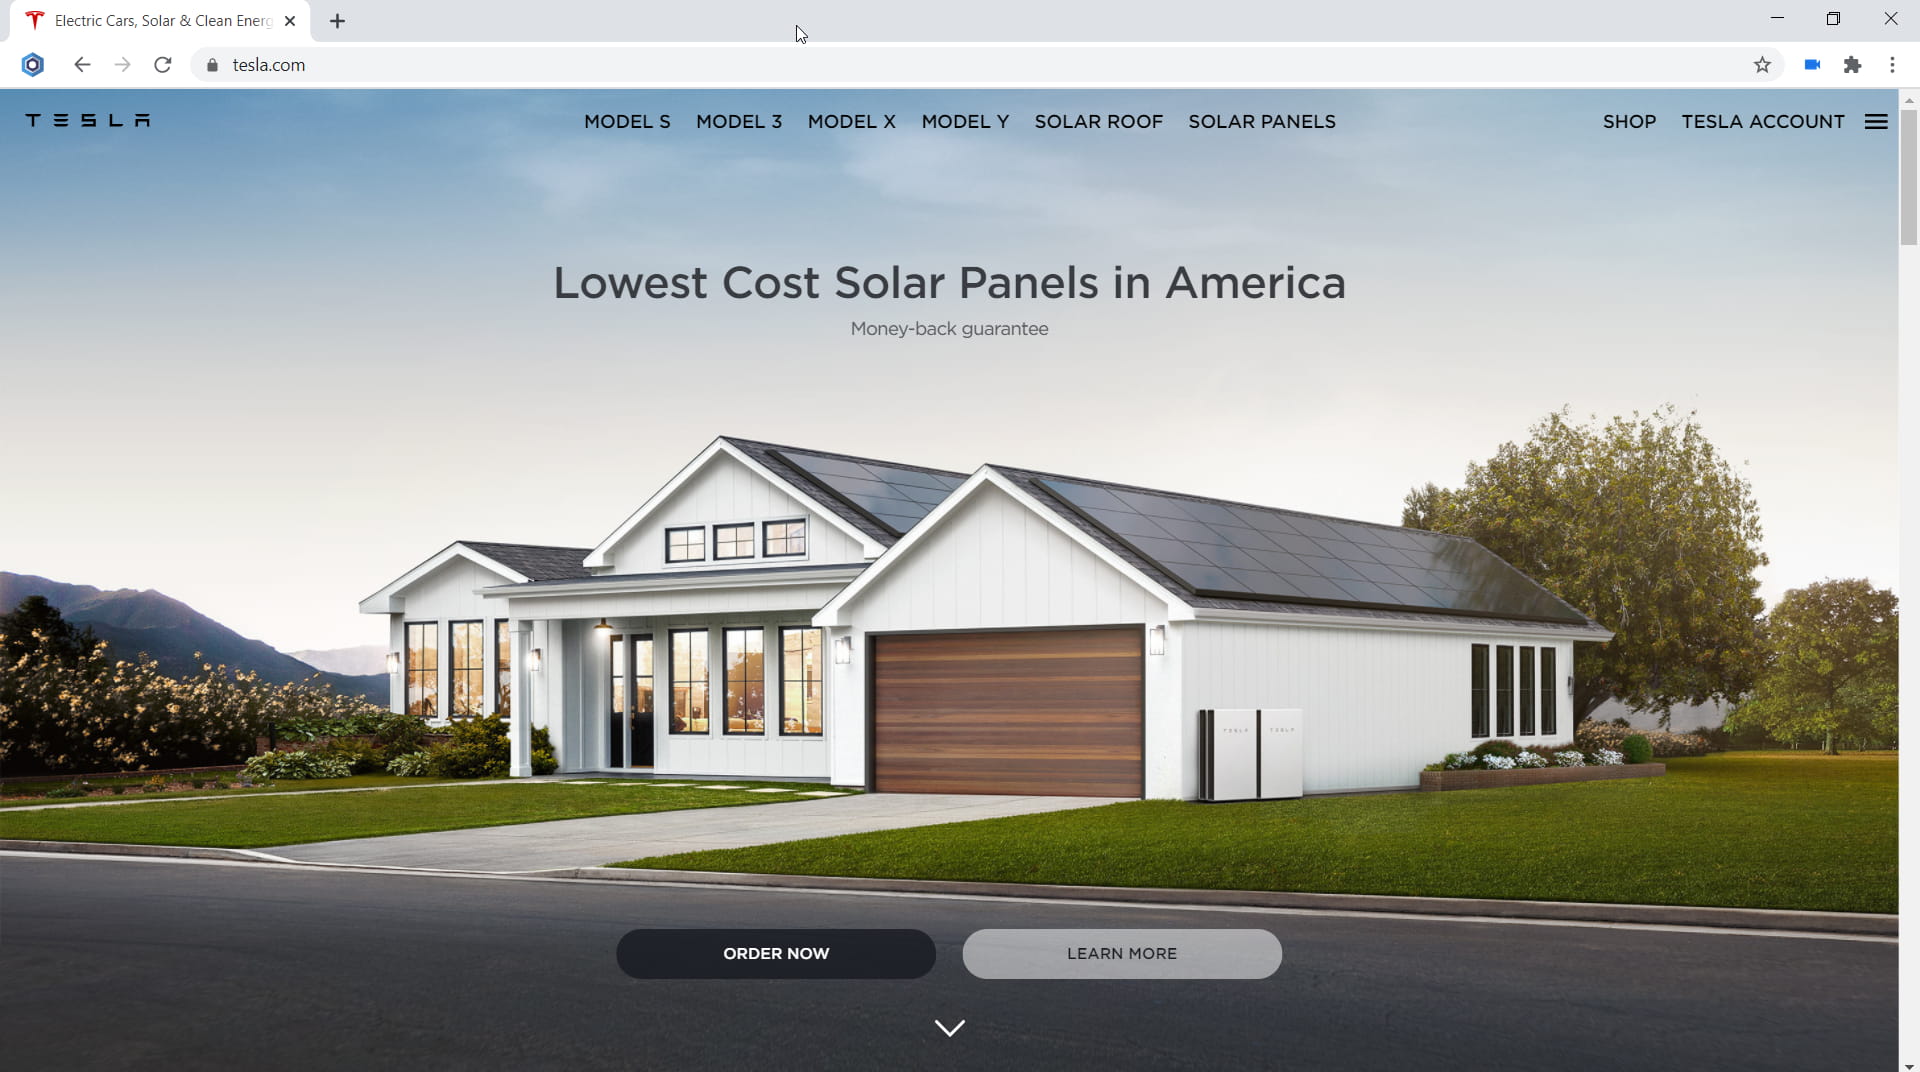
Browsing Mode
Developer Mode
Developer mode is an extended mode and includes the features you need for highly productive web development and testing. With enabled Developer mode, Blisk displays additional interface elements and controls: menus, notifications, device panes, devices, dialog overlays, etc. To learn more about Development Interface, see the Developer mode GUI section below.
Developer mode includes:
- More than 50 devices. Use different types of devices: mobiles, tablets, laptops, and desktops. You can use one device or multiple devices simultaneously. In addition, you can mix devices with a Chrome-like view - a regular responsive desktop view.
- Error monitor. Blisk continuously monitors for page errors in JavaScript and resources that failed to load. The user is notified when the issue appears on any device. and searches for the solution on StackOverflow.
- Screen Capture. Use different types of captures: screenshots or video recording. Take a screenshot of a single device or capture an entire device set. Annotate the screenshot with Image Editor.
- Page Auto-refresh Page Auto-refresh keeps the code updated to the latest version across devices. Web contents refresh automatically when you modify source code and save changes. CSS is updated even without page refresh. You decide which file types trigger Auto-refresh. Use Auto-refresh delay for complex projects with bundling or preprocessing.
- Other tools and features
Enable Developer Mode
To enable Developer mode, click the Developer Mode button to the left of Omnibox or use the keyboard shortcut Ctrl+M / ⌘+M. This will open the last used device set. In case you click this button for the first time: Blisk starts Device Manager.
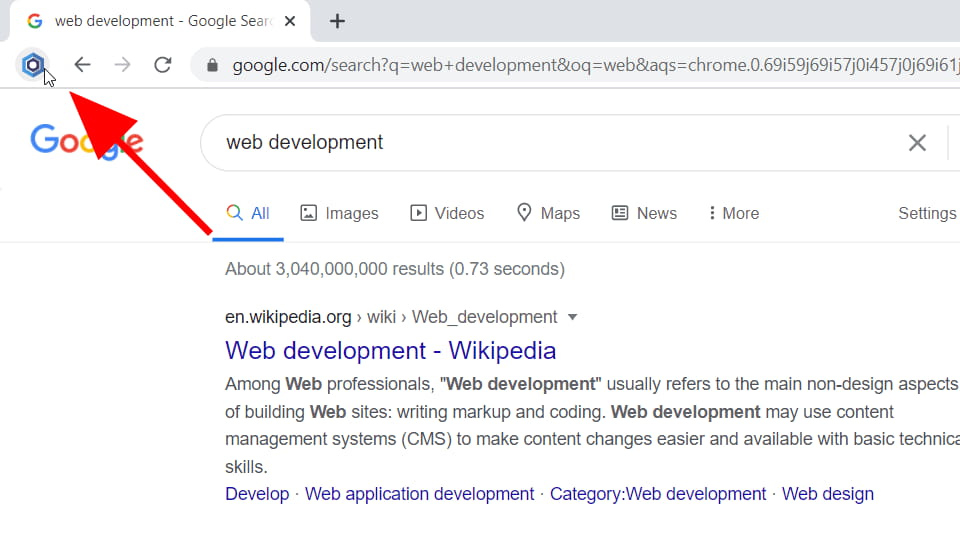
Enable Developer Mode
To use Developer Mode on any website:
Click Menu ➜ Settings ➜ Developer Mode and select Apply Developer Mode to All Domains in the dropdown.
Disable Developer Mode
To disable Developer mode, click the Developer Mode button to the left of Omnibox. You can also use Menu ➜ Device Set ➜ Exit Developer Mode.
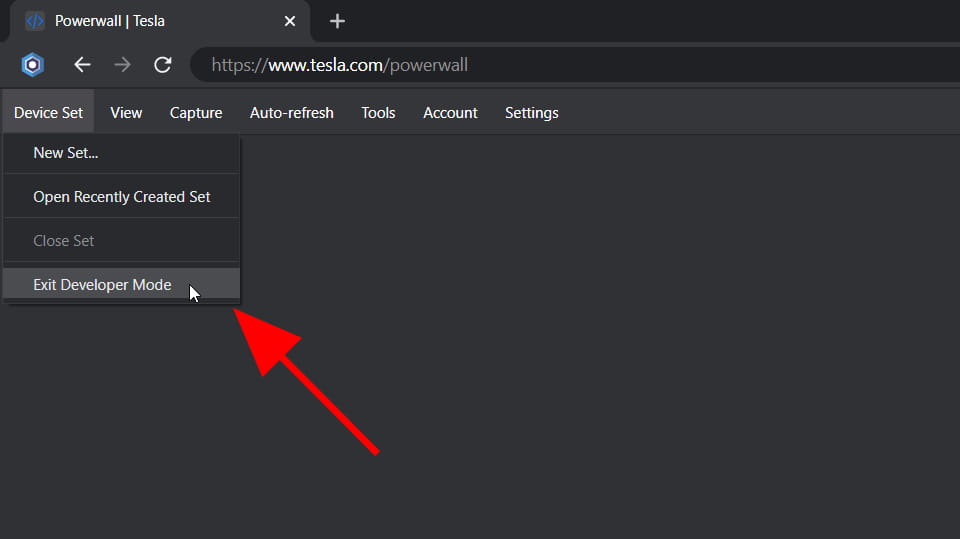
Exit Developer Mode
Development Domain
In some cases, you may need to automatically start a specific domain in Developer Mode. For these purposes, use the Development Domain button. When you click on this button, you will notice a checkmark appear and disappear. Thus, with a visible checkmark, Blisk indicates that Developer Mode starts with the current domain automatically.
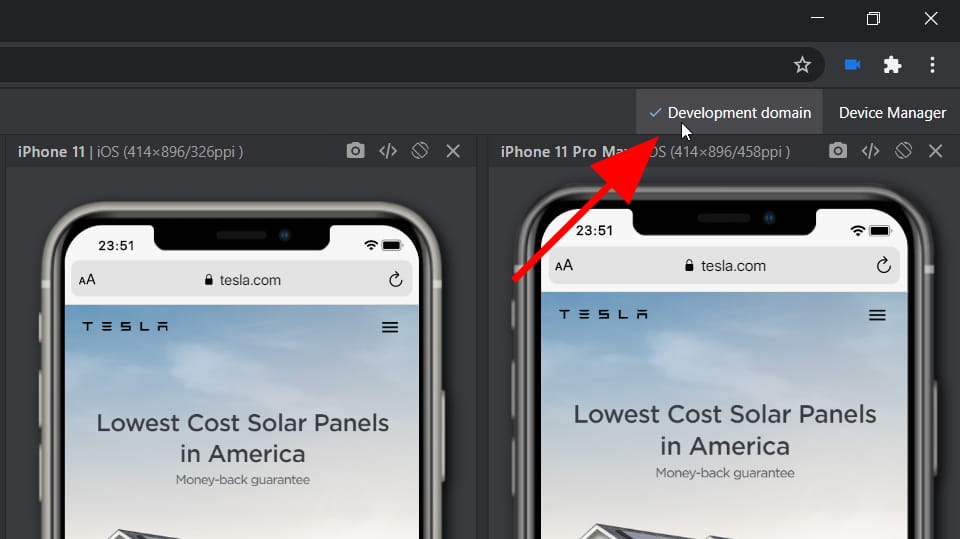
Development Domain
User Interface
Blisk is built on top of Chromium (also used by Chrome browser) and features a minimalistic material user interface.
Layout basics
Like many other browsers, Blisk uses a common user interface (tabs, address bar, toolbars, notifications) on the top to navigate and manipulate tabs, and Webview on the bottom, showing web content of opened URLs.
With enabled Developer Mode, Blisk displays additional interface elements and controls: menus, notifications, device panes, devices, dialog overlays, etc. To learn more about Developer Mode, see the Developer Mode section.
Blisk v.14
Menu
Use the Menu to manipulate your Device Set, to control the layout and the size of devices, to enable and disable features (e.g. Auto-refresh, URL Sync, Scroll Sync, Device Cache, etc).
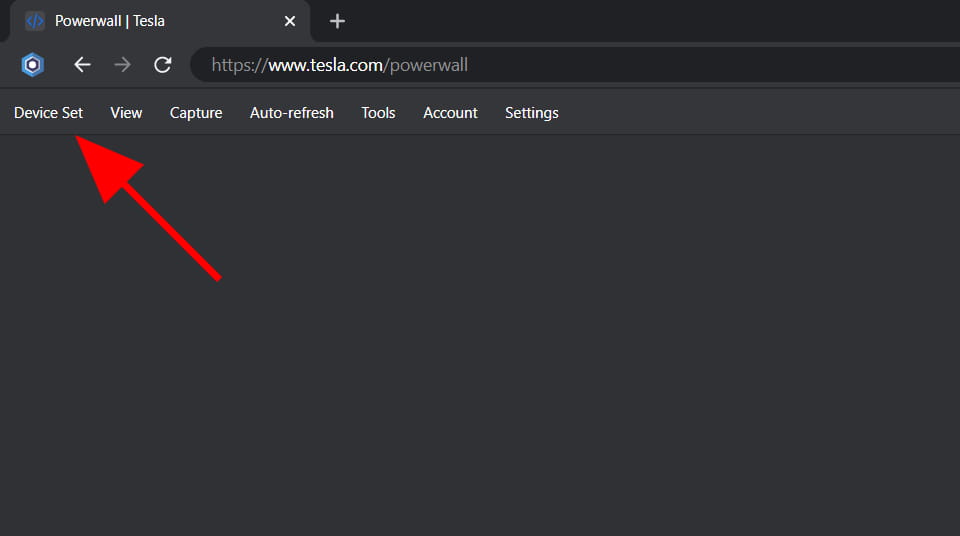
Menu in Developer Mode
Menu items
- Device Set: use the menu item to control the current device set. Learn more...
- View: use the menu item to control the look and feel of the user interface in Developer Mode. Learn more...
- Capture: use the menu item to use captures (take screenshots or record a video), and view your saved assets in cloud storage. Learn more...
- Auto-refresh: use the menu item to enable or disable Auto-refresh, update the settings of existing file watchers. Learn more...
- Tools: use the menu item to use extra built-in tools (Image editor, Scroll sync, URL Sync, Cache control). Learn more...
- Account: use the menu item to access your Blisk account, change your password, use Premium license, etc.
Device Manager
Device manager controls the list of devices in a Device Set and their size. Device Manager has a simple user interface: tabs with device categories and groups on the top, the list of devices on the left to select a device, and a list with selected devices on the right.
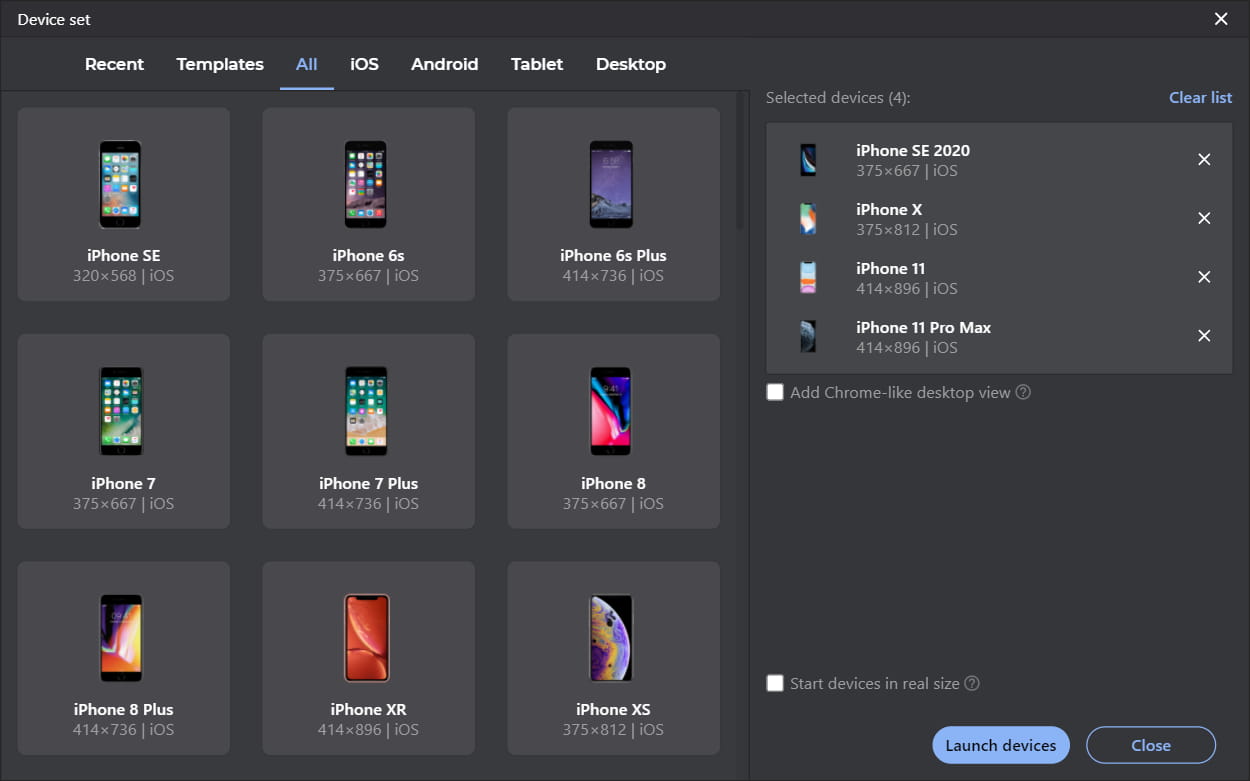
Device Manager
To launch Device Manager
- From Home Page: click New device set... from the Start section.
- From Developer Mode:
- Solution 1: Menu ➜ Device Set ➜ New Set...
- Solution 2: Click the Device Manager button on the top right.
With Device Manager, you can
- Create or edit your Device Set by selecting devices.
- Reorder the devices in Device Set with drag and drop.
- Start the devices in real size.
- Use Device Templates - the predefined lists of devices (e.g. iOS Mobile).
- View and launch recently used Device Sets.
Device Set & Device Pane
Device Set can contain one or more devices that are wrapped into Device Panes. The maximum number of devices is limited to eight units per Device Set to avoid high CPU load. Device Pane displays device information, device actions, errors and warnings, and device state.
Device Pane contains areas
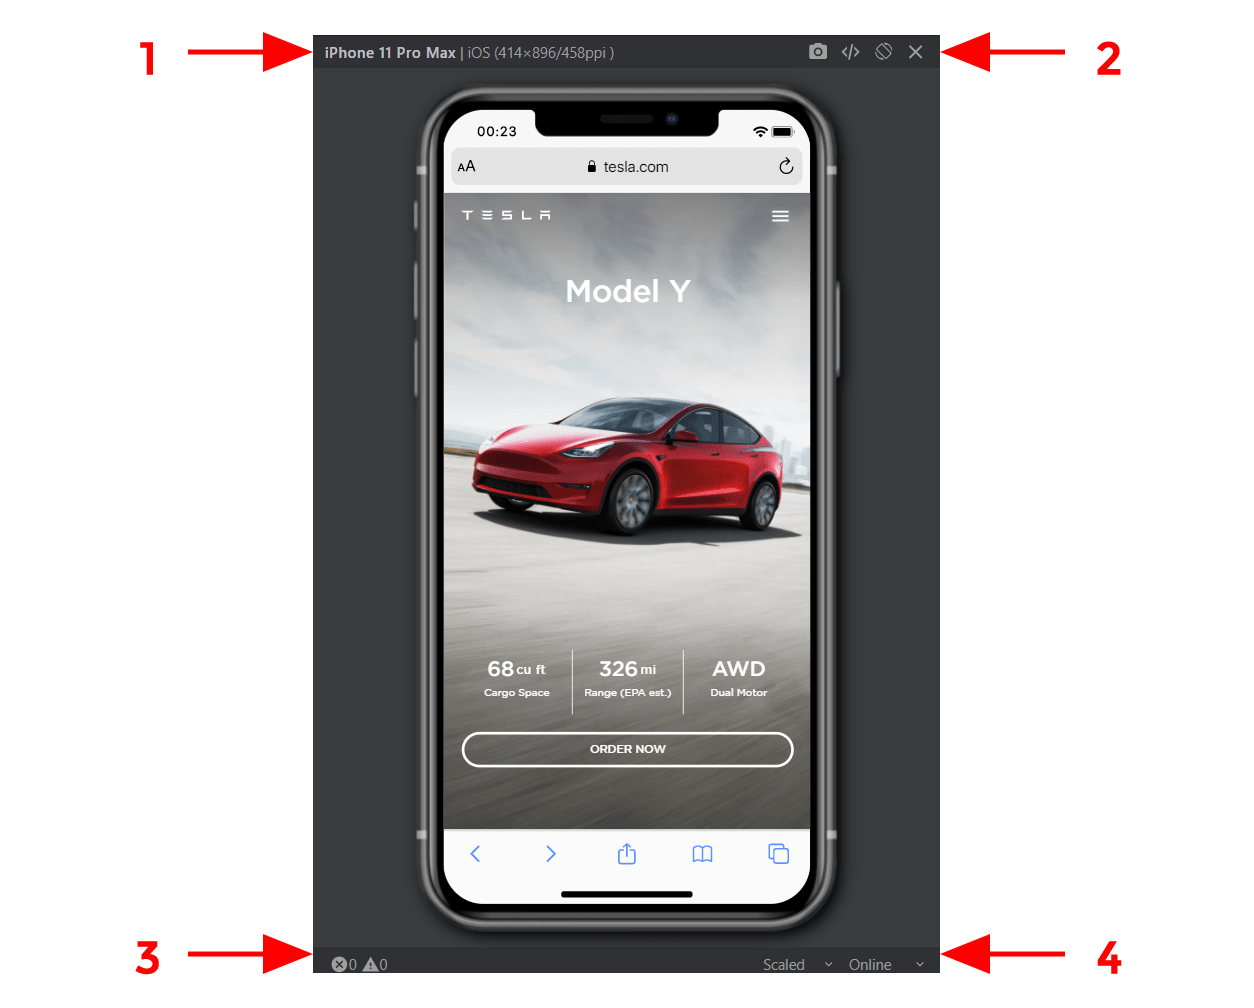
Device Pane
- Device Information - The area with device name and device properties (e.g. operating system, viewport size, PPI).
- Device Actions - Contains buttons to take a screenshot, launch Developer Tools, rotate the device, and remove the device from Device Set.
- Errors and Warnings - Displays the Errors and Warnings that appear on a webpage inside a device. Click this area to open the window Errors and Warnings and view the list of errors.
- Device State - The area contains dropdowns that control device size and network speed:
- Device Size: You can switch between Scaled Size and Real Size.
- Network Speed: You can simulate different networks ( Online, Fast 3G, Slow 3G, Very Slow).
Create Device Set:
Use Device Manager to create Device Set:
- Home Page ➜ click New device set from the Start section.
- Blisk starts Device Manager.
- Select the devices from the list and click Launch devices.
- Blisk creates Device Set with previously selected devices.
Edit Device Set:
To edit Device Set with enabled Developer Mode, click the button Device Manager on the top right. Update the list of devices in Device Manager and click Launch devices. Blisk will start the new Device Set.
Splitter
The Splitter appears inside Multi-device Set (a set with two and more devices), splits Device Panes, and allows to control the layout of Device Set. By dragging the splitter to left and right, you can adjust the size of devices.
Device Splitter
Use Menu ➜ View ➜ Reset Splitter Position reset the position of all Splitters in Device Set and restore the size of Device Panes to defaults (equal size).
Notice:
The splitter may cut the devices on small screens. To avoid device cutting, try resetting splitter position or change device size setting from Real Size to Fit to view or Relative Size. See Device scaling section for more details.
The splitter may cut the devices on small screens. To avoid device cutting, try resetting splitter position or change device size setting from Real Size to Fit to view or Relative Size. See Device scaling section for more details.
Themes
Color Themes let you modify the colors in Blisk's user interface to suit your preferences and work environment. By default, Blisk inherits the theme of your operating system (light or dark). Tip: After setting your OS to change the theme automatically to dark mode, Blisk will display in Dark theme at night time reducing the chance of eye injury.
Change the Color Theme
- Open Home Page or use the keyboard shortcut Ctrl+T / ⌘+T.
- Click Theme from Customize section
- In Settings window, select an option from Theme section.
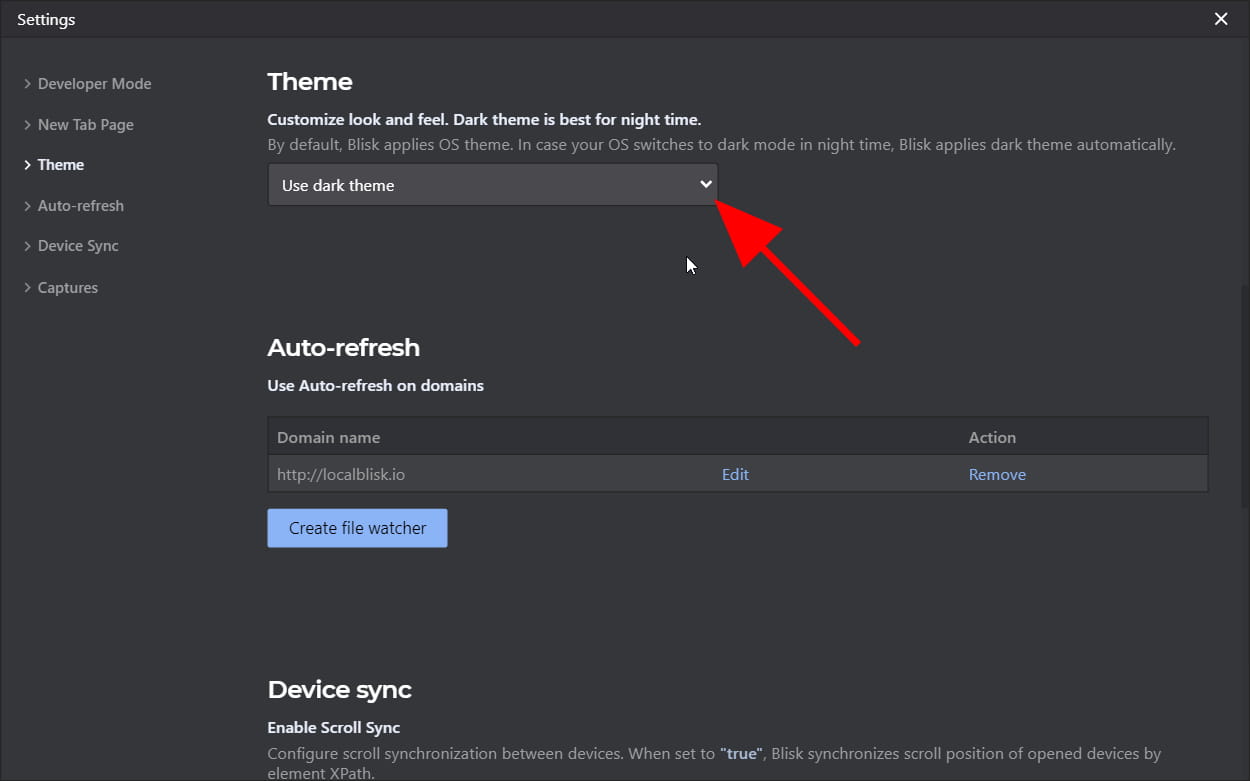
Apply dark theme
Notice:
Click Menu ➜ Settings ➜ Theme to change the theme directly from Developer mode.
Click Menu ➜ Settings ➜ Theme to change the theme directly from Developer mode.
Devices
Device is one of the core components in Blisk. The devices are built into the application and ready to use from the very beginning, so you do not need to download or install anything else. Devices display in Developer Mode only, enable Developer Mode to use them (see the Developer mode section).
Blisk emulates devices. We use technologies from Blink rendering engine, Chromium, and our own technologies to emulate devices. We use native technologies to emulate screen resolution, device pixel ratio, user agent, touch and touch events, orientation, dark mode, etc. Our solution does not use Iframes that are widely used on the web. That is why emulation of devices is very accurate and close to real-world examples.
You can use a single device or multiple devices simultaneously. To learn more about using multiple devices simultaneously, see the Multi-device Set section below.
Blisk offers devices of different operating systems, types, and viewports. See Device Manager section to use the devices and create device sets. Devices in Blisk use proper screen resolution, viewport, device pixel ratio, user-agent header, orientation (portrait or landscape), light and dark color theme, and support touch + touch events. What you should know:
- Screen resolution is the number of pixels a screen can show, both horizontally and vertically. So, a screen that has a resolution of 1920 x 1080 (a popular resolution that's also known as 1080p or Full HD), can display 1,080 pixels vertically, and 1,920 pixels horizontally. Blisk supports devices with different screen resolution: from small 320px to large 2560px screens.
- Device pixel ratio is the ratio of the resolution in physical pixels to the resolution in CSS pixels for the current display device. Blisk supports devices with usual or retina high-resolution display
- User-Agent request header is a string that lets servers and network peers identify the application, operating system, vendor, and/or version of the requesting user agent.
- Touch support. Mobile devices (phones and tablets) support native touch events: tap, double-tap, swipe etc.
Supported devices
The list of devices (mobiles, tablets, laptops, and desktops) supported by Blisk is available on the Device portal.
| Device Type | Device OS | Vendor |
|---|---|---|
| Mobile | iOS, Android | Apple, Google, Samsung, OnePlus, LG |
| Tablet | iPadOS | Apple |
| Laptop/Desktop | Windows, macOS | Apple, Dell |
| Chrome-like View | User's OS | User's device |
Using devices in Blisk:
Launch Device Manager to use one device or multiple simultaneously.
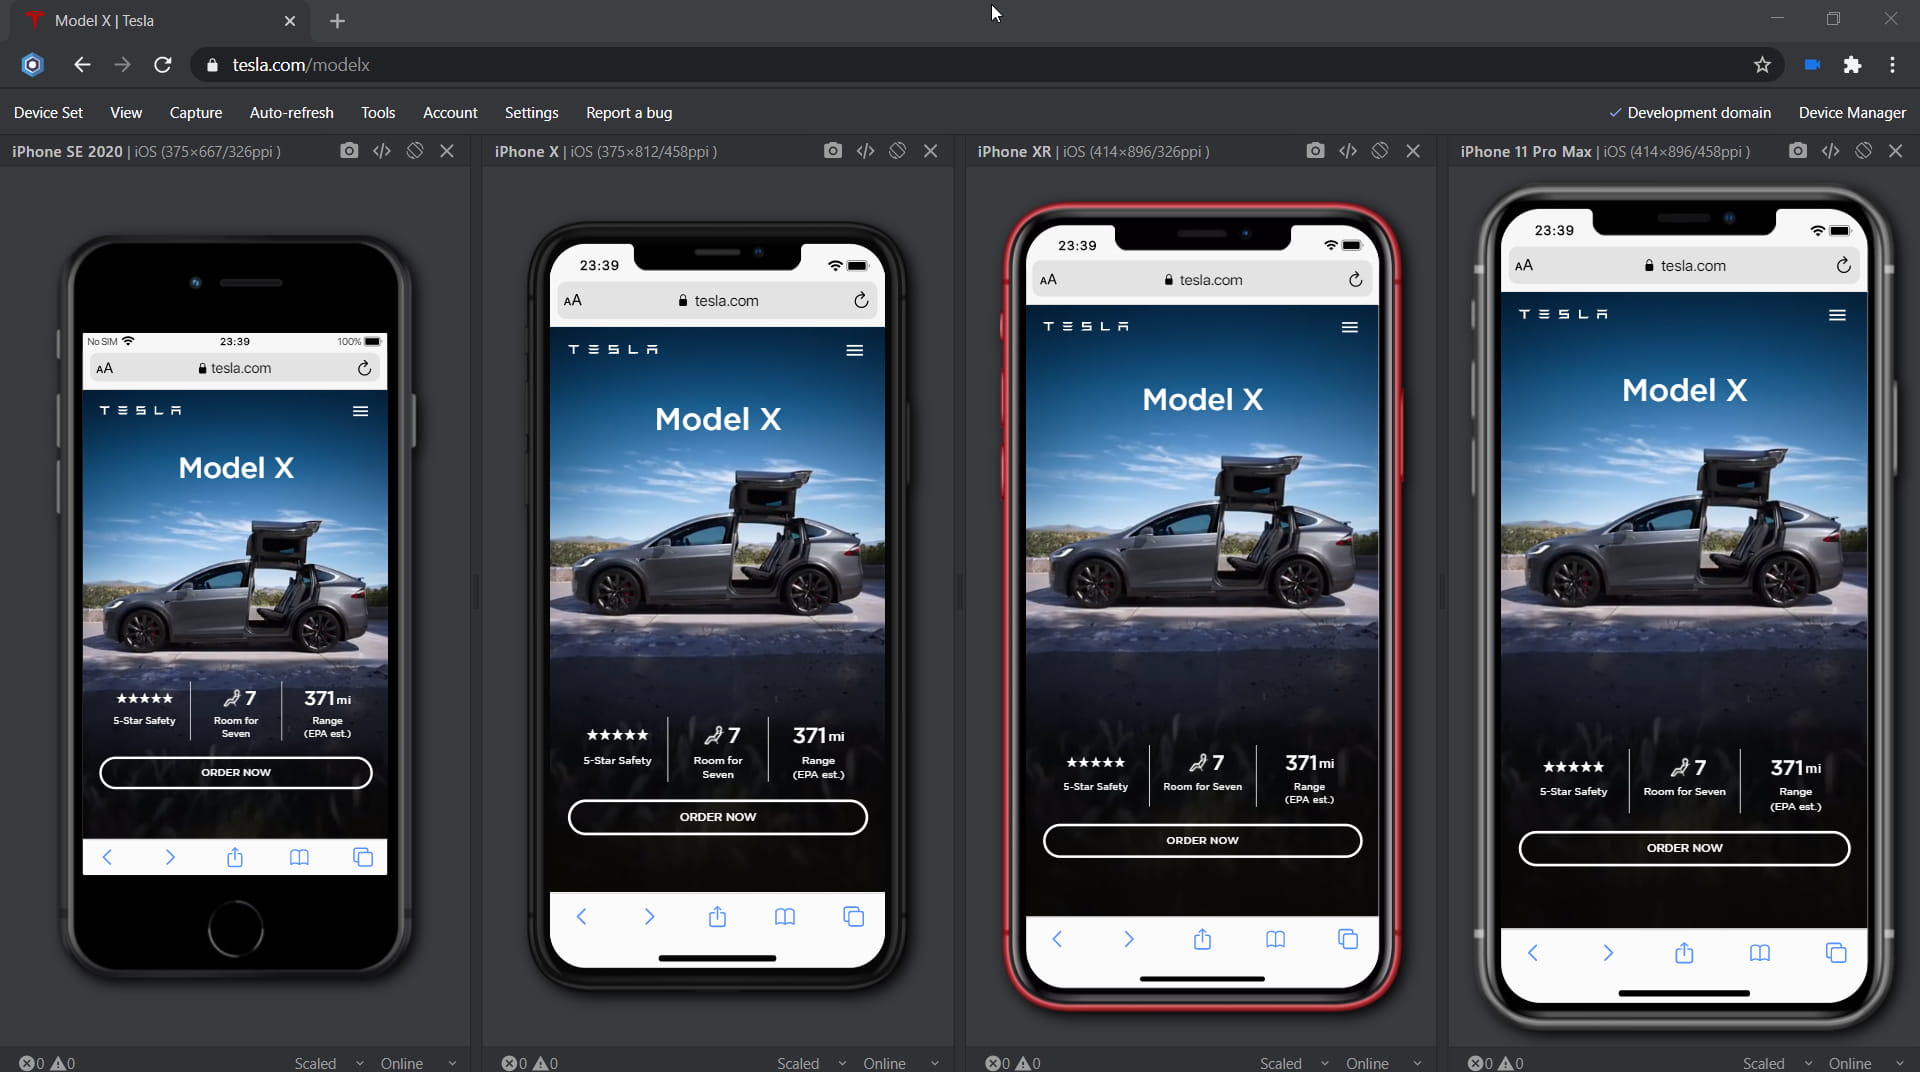
Multi-device Set
In Blisk, you can create a device set with multiple devices and use them simultaneously. You can mix devices of different types and operating systems to develop and test for mobile, tablet, and desktop simultaneously. With this approach, development tasks can be done twice faster than before.

Multi-device Set
When you use multiple devices simultaneously, they use a single shared Cache, Cookies, Local and Session storage, Database, etc. Thus, when you browse any website (Internet or Local Server), devices log into websites automatically and use the same website settings (e.g. Cookies and Local Storage). Use Menu ➜ Tools ➜ Enable Device Cache to control Caching.
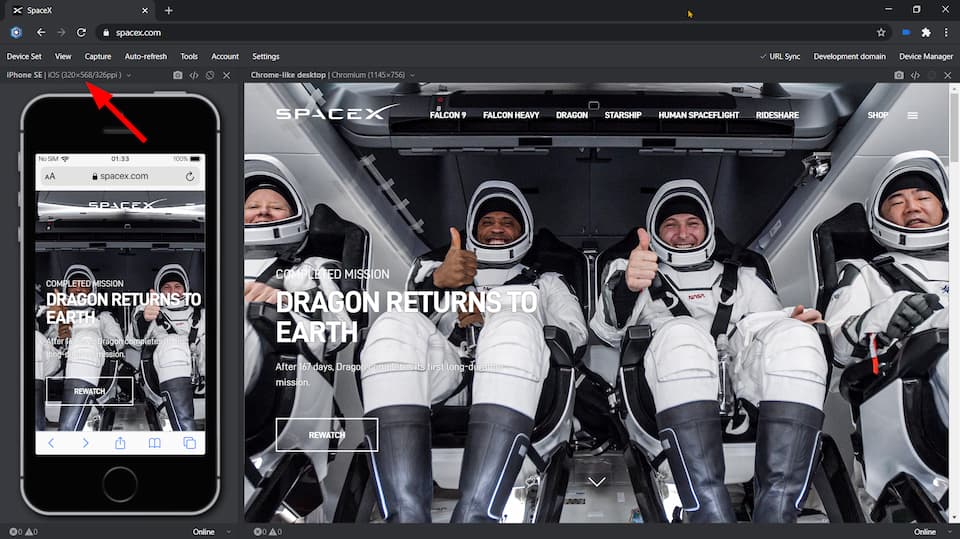
The most common case is using mobile along with Chrome-like view. Follow the steps:
- Go to Home Page ➜ click New device set. This will launch the Device Manager.
- Select any mobile device (e.g. iPhone X) and check Add Chrome-like desktop view.
- Click the button Launch devices. As a result, Blisk will create a device set with iPhone X and Chrome-like view.
Notice:
You can use the Template - a predefined Device set. To use a Template: start Device Manager ➜ click Templates ➜ select any Template from the list.
You can use the Template - a predefined Device set. To use a Template: start Device Manager ➜ click Templates ➜ select any Template from the list.
Change the device
You can change the devices appearing in the current Device set. Click the Device Manager button and edit the device set.
To quickly change one device, click the Device name at the top of Device Pane and select another device from the appearing dropdown menu.
Quick device switching in Blisk v.15
Portrait and landscape mode
Some devices like mobiles and tablets natively support landscape and portrait orientation. To switch the orientation, click the rotation button appearing at the top right corner of each Device Pane to toggle the landscape / portrait mode.
Zoom the device content
With the Device zoom (scaling the web content inside the device), you can preview the small elements on the web page or test zoom features.
To zoom the device:
- Hover over the screen of a phone or tablet or click inside the screen to focus on it
- Press
SHIFT(the Move cursor will appear) and drag. Dragging to the top will apply zoom in. Dragging to the bottom will apply zoom out.
URL Synchronization
By default, Blisk uses URL synchronization (URL Sync) for Device set with multiple devices. Devices from the device set navigate to the current URL in the Address Bar (Omnibox). When you click any link or perform navigation on one device, URL Sync navigates the other devices to the same URL. As a result, devices follow each other by URL. This approach works with regular websites and single-page applications.
URL Sync management. URL Sync works per tab: its state can be changed manually on each tab. To enable or disable URL Sync, use Menu ➜ Tools ➜ Enable URL Sync.
Redirects. In case your web application has some custom redirect specified, the device navigates with a redirect. Blisk monitors for cases with too many redirects. When devices start redirecting each other multiple times and create an infinite loop of redirects, Blisk stops redirects, disables URL Sync, and displays a dialog window with a warning. You can enable URL Sync directly from this dialog window.
Scroll Synchronization
By default, Blisk uses Scroll synchronization (Scroll Sync) for Device set with multiple devices. When you scroll one device, the other devices follow the current device by scroll position automatically. As a result, devices follow each other by scroll position.
Notice:
Scroll Sync does work when you scroll the BODY or HTML element. This feature does not work with other scrollable elements (e.g. scrollable DIV).
Scroll Sync does work when you scroll the BODY or HTML element. This feature does not work with other scrollable elements (e.g. scrollable DIV).
Scroll Sync management. The state of Scroll Sync applies to the whole window. It means that if you disable Scroll Sync on tab #1, Scroll Sync will be disabled on tab #2, #3, etc. To enable or disable Scroll Sync, use Menu ➜ Tools ➜ Enable Scroll Sync.
Templates
Template is another handy feature in Blisk that offers a better way of using your favorite devices in Blisk. Template is a saved set of devices ready to use for your next project. Blisk offers two ways of using Templates:
- Use one of the premade Templates.
- Create a custom Template.
Premade Templates
Launch the Device Manager and select the Templates tab in order to use one of the premade Templates.
Create custom Template
Use Menu ➜ Device Set ➜ Create Template to create a custom Template with any devices of your choice and to set a custom template name.
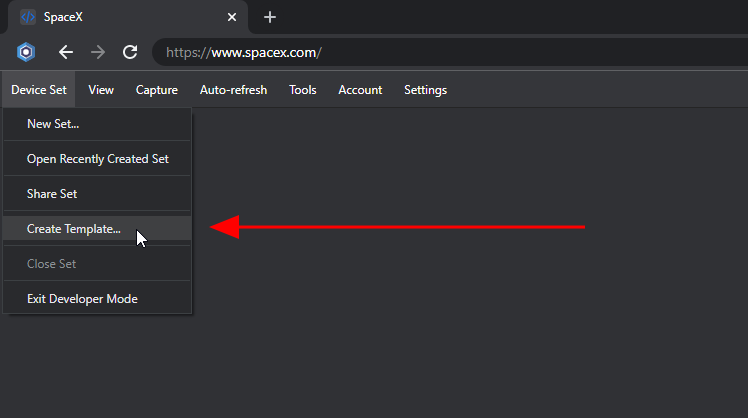
Create custom Template in Blisk
Address bar position on iOS
Notice:
This feature is not available in Blisk v.22 and later as iOS 17+ does not support this feature anymore.
This feature is not available in Blisk v.22 and later as iOS 17+ does not support this feature anymore.
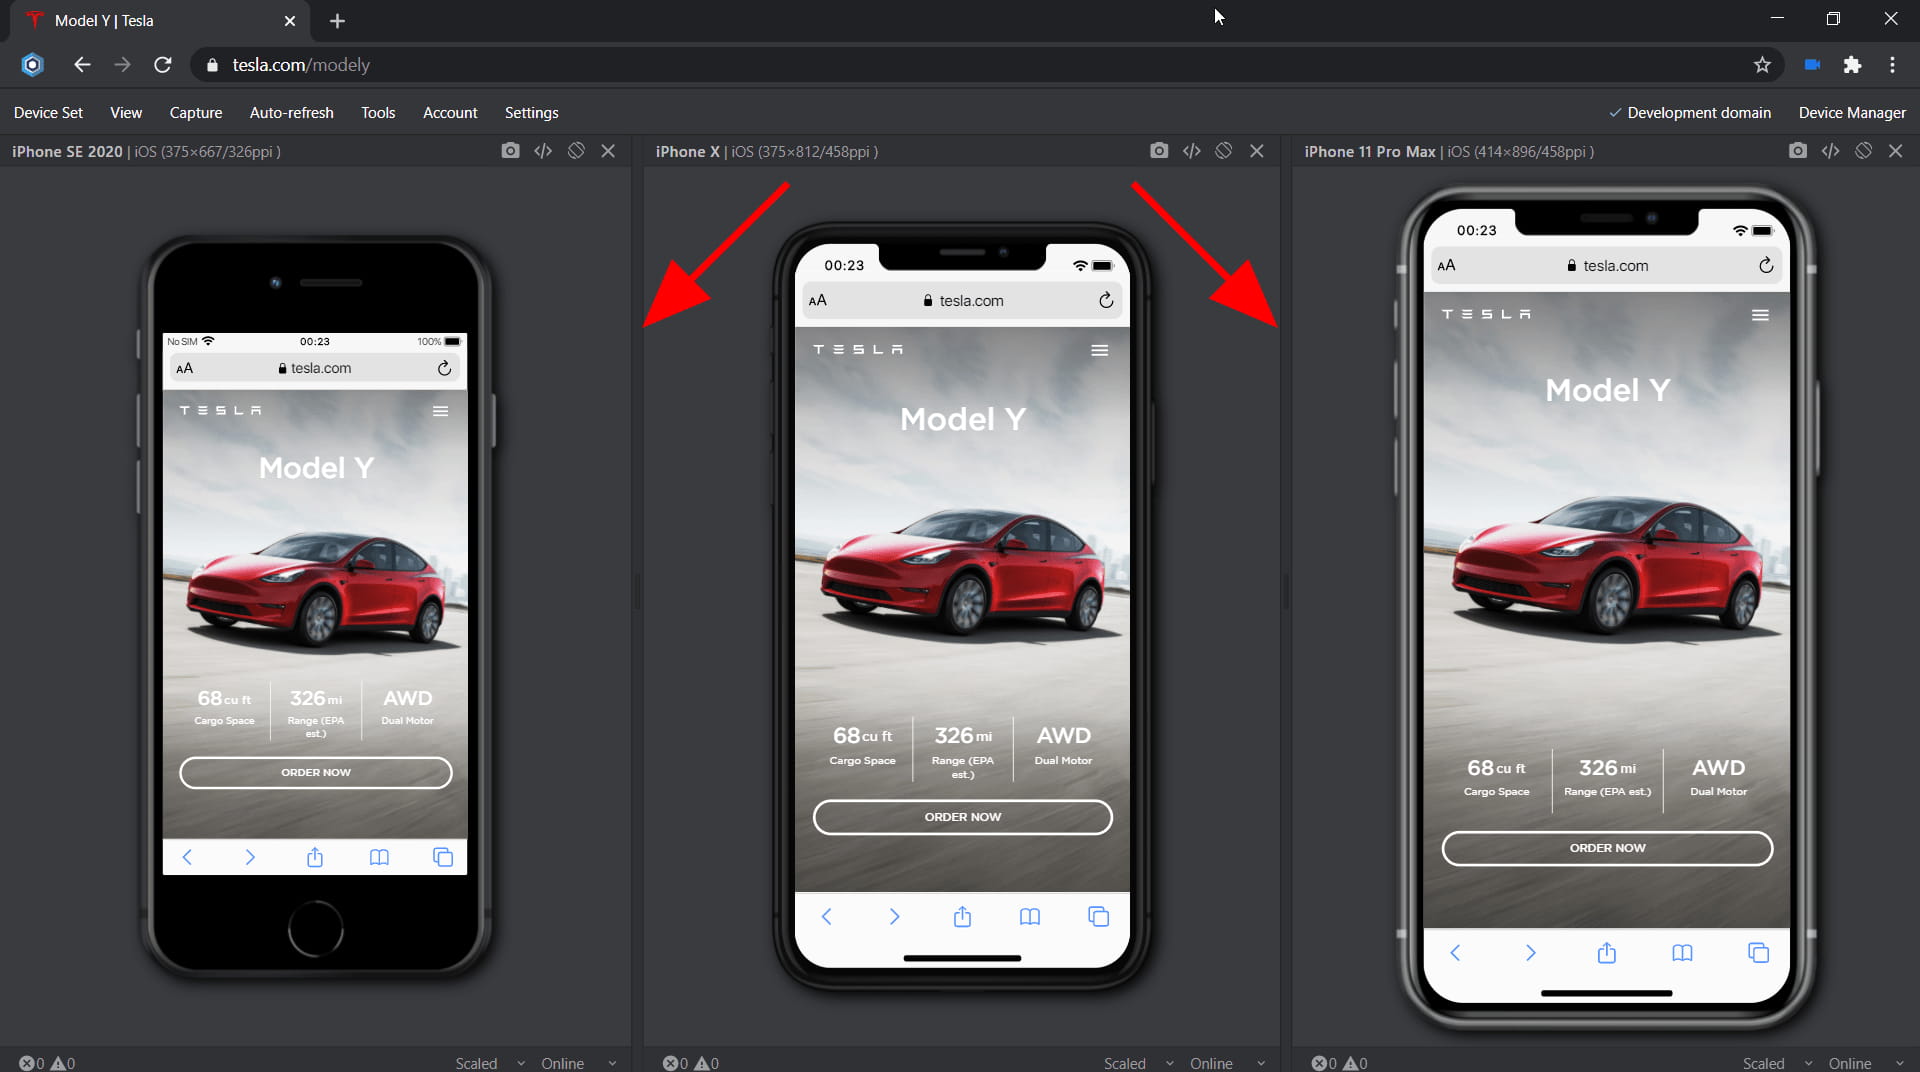
Since the release of iOS 15, the Apple mobiles switched to bottom address bar by default. Blisk also switched to the bottom address bar by default. Starting with Blisk v.19, you can toggle the address bar position for iOS-based devices between the top and bottom positions. Blisk offers a new Toggle Address Bar Position to Top/Bottom button in the Device header of each iOS device.
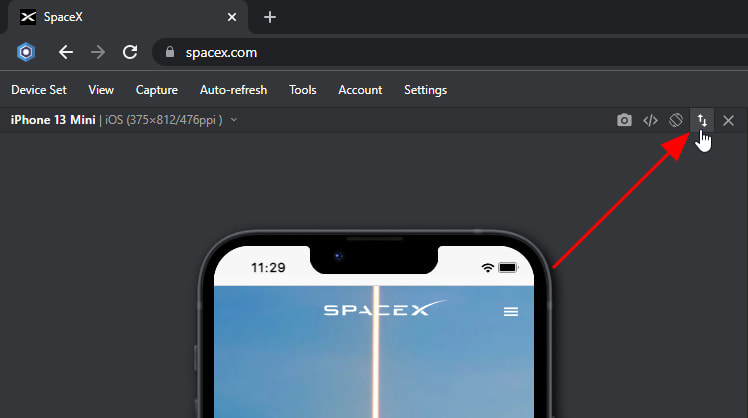
Toggle Address Bar Position on iOS devices in Blisk
Toggle Address Bar Position on iOS devices in Blisk
Notice:
The feature applies to iOS devices only, Android mobiles do not offer such a feature.
The feature applies to iOS devices only, Android mobiles do not offer such a feature.
View
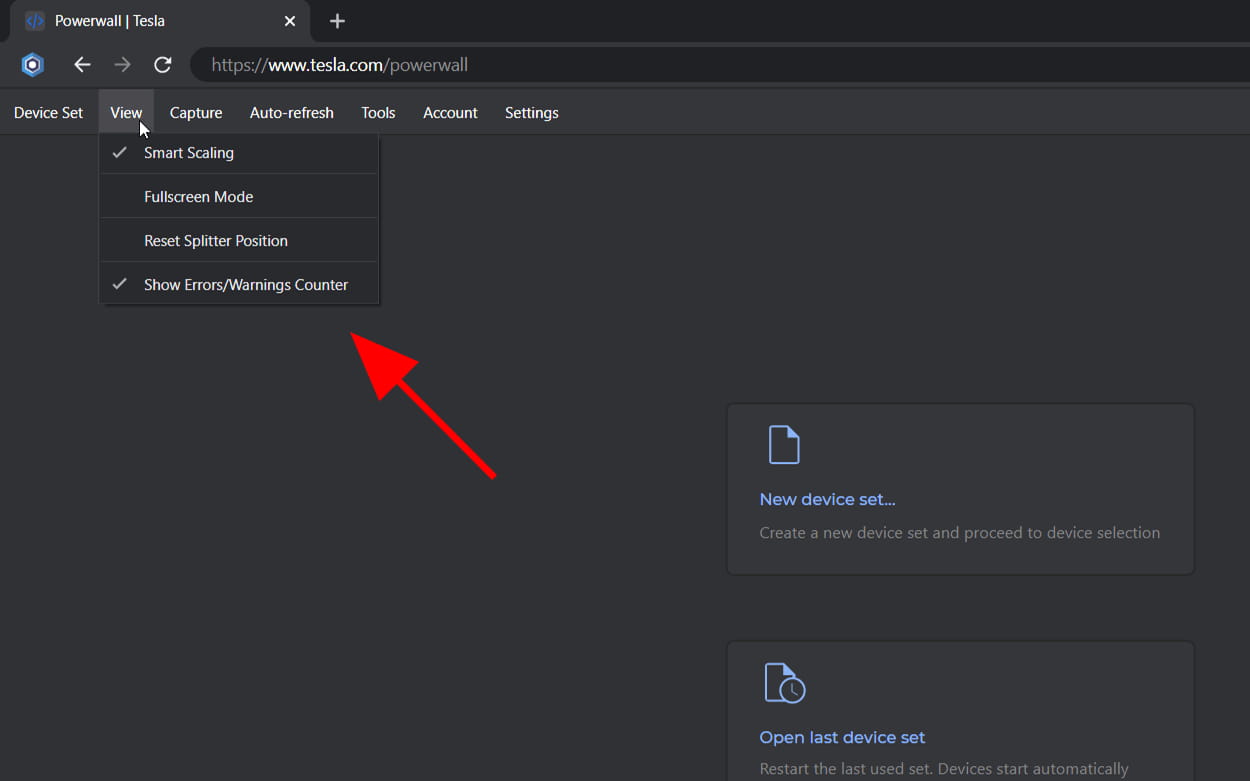
View Menu
Use Menu ➜ View to control the look and feel of Blisk while working in Developer Mode. This menu item has the following options:
Devices scaling
Menu ➜ View ➜ Devices Scaling is a global setting that specifies the device rendering style and size. The setting has 3 options available:
- Fit to view is a default value. When enabled, the devices display in their maximum size to fill the device pane. This setting is recommended for small screens (e.g. laptops with small resolution).
- Relative Size - displays phones across all tabs in relative size to each other (the largest phone has max height). The feature works best with up to 4-5 phones in Device Set depending on the screen resolution. This option is recommended to use with large screens (e.g. desktops starting 1400px wide).
- Real size - displays phones across all tabs in relative size to each other (the largest phone has max height). The feature works best with up to 4-5 phones in Device Set depending on the screen resolution. This option is recommended to use with large screens (e.g. desktops starting 1400px wide).
Full Screen
Menu ➜ View ➜ Full Screen is a global setting that launches the current Window in full-screen mode. F11 is an alternative shortcut to toggle the full-screen mode.
Splitter Position
Splitter is another important element of the user interface that helps to resize the Device Pane and to position the devices. By dragging the splitter to left and right, you can adjust the size of devices with enabled option "Fit to view" or "Relative Size".
Starting with version 21.0, Blisk automatically saves and restored Splitter location, eliminating the need to move Splitter after launching a Device set. Automatic save and restore of Splitter location works in the following way:
- When you create or launch a device set, Blisk watches for the device type and device order in it. If you previously specified a custom Splitter location for such device schema - Blisk will apply the previously saved location automatically.
- If you move Splitter to another location - the new location will be saved automatically.
- Whenever you need to reset Splitter - use Menu (Developer Mode) ➜ View ➜ Align width of device panels.
As a result, Blisk will restore the splitters and device sizes for every session, users will work with the same configuration of device set even after application relaunch. Users will not need to configure the device set in every session.
Examples of Splitter location
For a better understanding of this feature, check out the examples of device sets and how Blisk interprets them in terms of Splitter location. Notice: these are just a few examples, this feature is not limited by device number.
Example 1:
Device set:
iPhone SE + Chrome-like view
Will be interpreted for Splitter as:
Mobile + Chrome-like view
If you specify device set with Galaxy S22 + Chrome-like view, then this Splitter schema will apply automatically because these devices are: Mobile + Chrome-like view.
If you specify device set with iPad 10 + Chrome-like view, then this Splitter schema will not work because these devices are: Tablet + Chrome-like view.
Example 2:
Device set:
iPhone 14 + Galaxy S22 + iPad 10
Will be interpreted for Splitter as:
Mobile + Mobile + Tablet
If you specify device set with LG G6 + iPhone SE + iPad Mini, then this Splitter schema will apply automatically because these devices are: Mobile + Mobile + Tablet.
If you specify device set with iPad Mini + iPhone SE + LG G6, then this Splitter schema will not work because these devices are: Tablet + Mobile + Mobile.
Notice:
- In terms of Splitter location and device size, Blisk does not watch for device name, Blisk watches only for device type (Mobile/Tablet/Desktop/Chrome-like view).
- This feature is not limited to the number of devices in device set.
Align width of device panels
Use Menu ➜ View ➜ Align width of device panels to make the panels the same width and resize the devices inside panels accordingly.
Show Errors and Warnings
Menu ➜ View ➜ Show Errors and Warnings is a global setting that shows or hides Page Errors and Warnings Counter inside each Device Pane.
Developer Tools in Blisk
Blisk features best-in-class DevTools same as in Chrome with multiple features for inspecting elements, debugging the code, measuring performance, investigating network requests and memory usage, and more! The application has a convenient way to use all the features of Developer Tools in both development and browsing modes.
Starting with version 21.0, Blisk supports two modes of working with DevTools:
- Unified DevTools (Default). Universal DevTools is a single DevTools container docked to the right or to the bottom of Blisk window. Universal DevTools provide the ability to manipulate DevTools for a single device. The user is able to quickly switch the DevTools for another device by launching DevTools for that device. In this case, the new DevTools replace the old DevTools.
- Multi-DevTools appear to the right of each device. This mode enables to use multiple DevTools simultaneously. Multi-DevTools mode does not support docking DevTools to the right and to the bottom of Blisk window.
Unlike other solutions, Blisk users are able to use multiple Developer Tools for each device independently. In addition, you can:
- Undock multiple Developer tools.
- Inspect HTML elements in a convenient way.
- Undock Developer tools into a separate window.
- Start Developer tools in a separate window.
Capture
With Blisk, you can take screenshots, record videos of your screen, edit assets and save them to the Cloud storage.
After taking a screenshot, Blisk launches Image editor with the options to annotate a screenshot, save it locally or save the asset to a cloud storage. Images saved in Cloud storage can be easily shared with your teammates.
Take screenshot of one device
Click the button with Camera icon appearing at the top right corner of each Device pane to take a screenshot of a separate device.
Captures via Menu

View Menu
Use Menu ➜ Capture to use capturing features, like taking screenshots and recording videos, and to access your saved assets. This menu item has the following options:
- Take Screenshot of Device Set - use this feature to take a screenshot of the entire device set. After taking a screenshot, Blisk starts Image Editor, where you can annotate the screenshot and save it locally or to the cloud storage.
- Record Video - use this feature to record a video of the entire screen or custom window. After recording a video, Blisk uploads the video to the cloud storage automatically.
- Saved Screenshots and Videos - click this menu item to open cloud storage and view saved assets in the cloud. You can share the assets from the cloud with your teammates, download them and attach them to bug reports, etc.
Notice:
By default, Blisk starts Image Editor after taking a screenshot. In case you want Blisk to automatically upload screenshots to the cloud storage after taking them, use Menu ➜ Capture ➜ Capture Settings and change the setting.
By default, Blisk starts Image Editor after taking a screenshot. In case you want Blisk to automatically upload screenshots to the cloud storage after taking them, use Menu ➜ Capture ➜ Capture Settings and change the setting.
Page Auto-refresh
Page Auto-refresh keeps the code updated to the latest version across devices. Web contents refresh automatically when you modify source code and save changes. CSS is updated even without page refresh.
Basics of Page Auto-refresh
Page Auto-refresh works with domains, not specific URLs. If you set up auto-refreshing for http://localhost, Blisk will refresh all URLs from this domain automatically (e.g. http://localhost/some-page).
Page Auto-refresh works with different file formats. You can specify any file format to trigger Page Auto-refreshing when these files change, for example:
- Regular web files: HTML, CSS, JS.
- Platform-specific: CSHTML, JAVA, PHP, PY.
- Font files: OTF, TTF, WOFF.
- Raster and vector images: JPG, PNG, SVG.
Page Auto-refresh works with folders. You need to specify at least one folder that will be watched for changes. When any specified file format changes in this folder, the webpage in devices refreshes automatically.
Notice:
Watching a folder with many subfolders and files may affect high CPU load. To avoid high CPU load, specify the folder of the lowest system hierarchy level (e.g. watching drive C: is not the best practice).
Watching a folder with many subfolders and files may affect high CPU load. To avoid high CPU load, specify the folder of the lowest system hierarchy level (e.g. watching drive C: is not the best practice).
Setting up Page Auto-refresh
Follow the steps to set up Page Auto-refresh for your local environment:
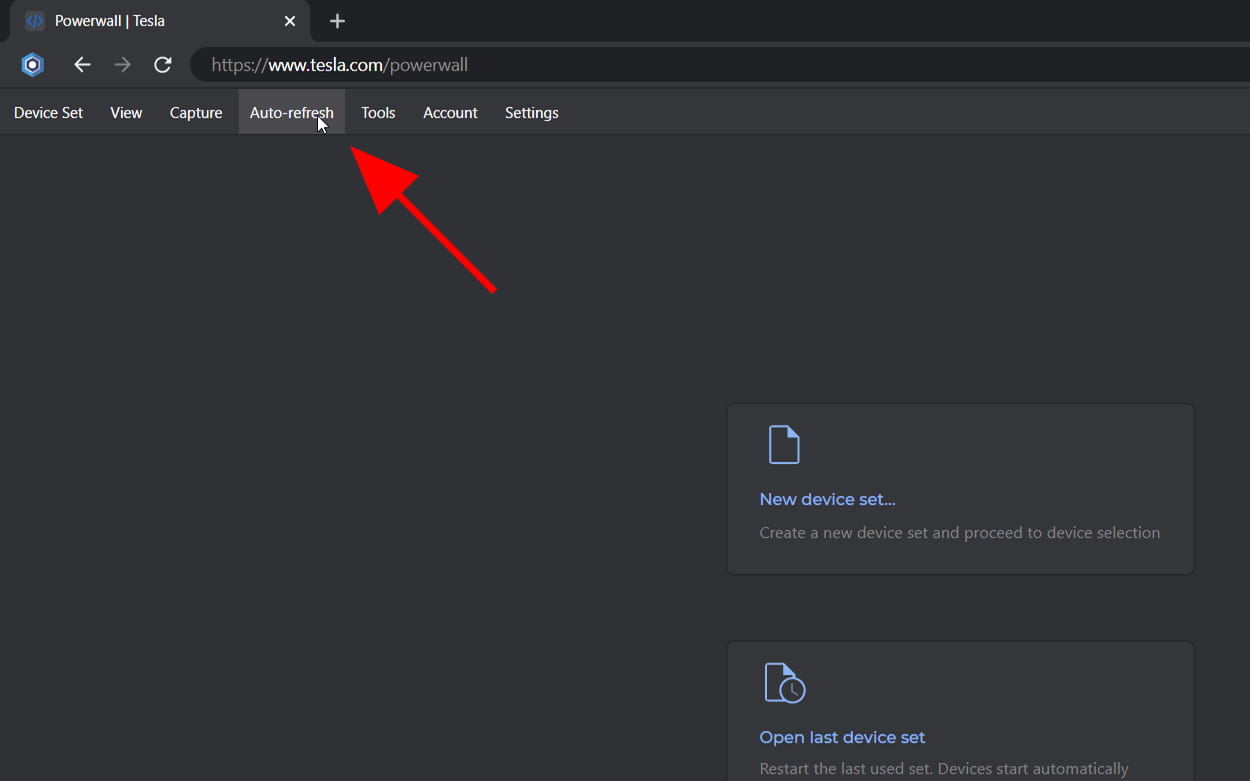
Auto-refresh Menu
- Navigate to the domain you want to refresh automatically and enable Developer Mode.
- Click Menu ➜ Auto-refresh. Blisk shows the Window with Auto-refresh setup.
- Specify the Auto-refresh settings:
- Textbox with domain name that will be refreshed automatically. The current domain from Address Bar (Omnibox) will be preselected. You can specify another domain name. Note: best practice is to copy the URL from the Address bar.
- Textbox with file formats. The specified file formats will trigger the webpage to refresh automatically. File formats should split by comma.
- The button Select Folder. Click this button, browse across your local file system, and select the needed folder. Blisk will watch for the changes in files within this folder.
- Click OK. Blisk saves Page Auto-refresh settings and enables created Auto-refresh.
- As a result, Blisk shows checkbox in Menu ➜ Auto-refresh, meaning that Page Auto-refresh is enabled for the current domain.
Notice:
In case the checkbox is missing in Menu ➜ Auto-refresh: check the URL. You may have specified the incorrect URL in Auto-refresh settings or you navigated to the incorrect URL.
In case the checkbox is missing in Menu ➜ Auto-refresh: check the URL. You may have specified the incorrect URL in Auto-refresh settings or you navigated to the incorrect URL.
Edit created Page Auto-refresh
Follow the steps to edit Page Auto-refresh settings:
- Navigate to the domain that has Page Auto-refresh specified.
- Click Menu ➜ Auto-refresh. Blisk shows the Window with Auto-refresh setup.
- Modify the Auto-refresh settings
- Click OK. Blisk saves changes in Page Auto-refresh settings.
TIP To view CSS and JavaScript changes, you may need to disable Cache: click Menu ➜ Tools ➜ Enable Device Cache.
Notice:
To view and modify the list of domains with previously setup Page Auto-refresh, click Menu ➜ Settings ➜ Auto-refresh.
To view and modify the list of domains with previously setup Page Auto-refresh, click Menu ➜ Settings ➜ Auto-refresh.
Notice:
You may need to use Advanced Settings of Page Auto-refresh in case you work on complex projects with bundling or preprocessing. You can enable/disable CSS Live Reload and specify custom Auto-refresh Delay.
You may need to use Advanced Settings of Page Auto-refresh in case you work on complex projects with bundling or preprocessing. You can enable/disable CSS Live Reload and specify custom Auto-refresh Delay.
Integrations
Blisk integrates smoothly with your workspace (web browsers, command line, and extensions). Starting with version 16, you can:
- Share custom Device Set and Url with your team.
- Launch Blisk from Command Prompt (Windows) and Terminal (macOS and Linux).
- Launch Blisk from other browsers by using Blisk link.
Command Prompt and Terminal
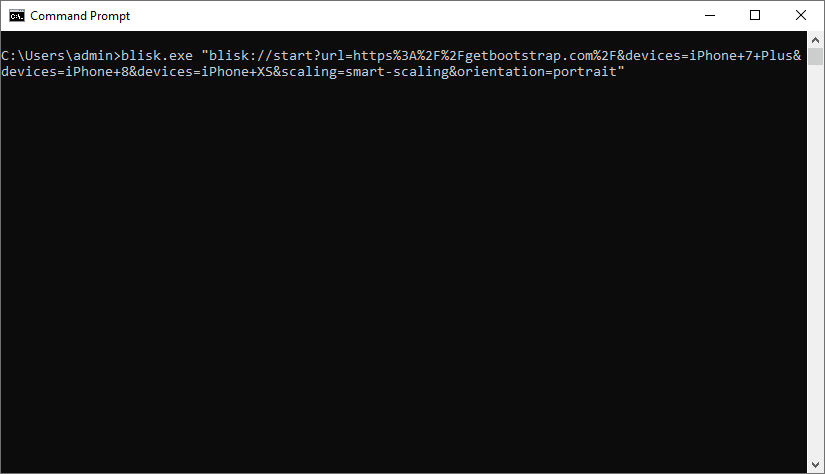
Launching Blisk from Command prompt
Generate a Command:
Use Menu ➜ Device Set ➜ Share Set to generate a Сommand that you will use in Command Prompt (Windows) or Terminal (macOS and Linux). Blisk will launch the wizard Share Device Set:
- Select Command and click Next.
- Select devices: click devices on the left to create a device set. This device set will appear on your command later. Сlick Next.
- Url and settings: Specify the Url that will be launched from your command. The Url should start with http:// or https://. If needed, you can specify the device scaling or device orientation. Landscape mode is only supported for mobile phones and tablets. Сlick Next.
- Result: Blisk will show up ready to use commands for Windows, macOS, and Linux. Copy the command.
- Use the command: Launch the Command Prompt (Windows) or Terminal (macOS and Linux), paste the command and execute it. This will launch Blisk with specified devices, Url, and device settings.
Notice:
You can share the command with your team to use the same development environment. This feature is supported with Blisk v.16 and later. Your teammates may need to update Blisk to use this feature.
You can share the command with your team to use the same development environment. This feature is supported with Blisk v.16 and later. Your teammates may need to update Blisk to use this feature.
Blisk link
Blisk link is a custom link that launches Blisk application from other browsers' address bar (Omnibox), extension, bookmarklet, or Html link.
Blisk link example: blisk://start?url=https%3A%2F%2Fgetbootstrap.com%2F&devices=iPhone+12&scaling=smart-scaling&orientation=portrait
Html link example: <a href="blisk://start?url=https%3A%2F%2Fgetbootstrap.com%2F&devices=iPhone+12&scaling=smart-scaling&orientation=portrait">Launch in Blisk</a>
Requirements:
You need to install Blisk URL Handler to use Blisk links. This URL Handler recognizes Blisk links - the custom URLs that start with blisk://. Use Menu ➜ Settings ➜ Integrations to install Blisk URL Handler.
Generate a Blisk link:
Use Menu ➜Device Set ➜ Share Set to generate a Blisk link that you will use in other browsers. Blisk will launch the wizard Share Device Set:
- Select Blisk link and click Next.
- Optional Step: install Blisk URL Handler in case it is missing on your system. Click Install URL Handler.
- Select devices: click devices on the left to create a device set. This device set will appear in your link later. Сlick Next.
- Url and settings: Specify the Url that will be launched from your link. The Url should start with http:// or https://. If needed, you can specify the device scaling or device orientation. Landscape mode is only supported for mobile phones and tablets. Сlick Next.
- Result: Blisk will show up ready to use Blisk link and Html link. Copy the needed link.
- Use the link or share it with your team:
- Blisk link: open any browser and paste this link into the address bar (Omnibox), use this link in a bookmarklet or your extension. On execution, Blisk will launch the specified device set and Url.
- Html link: paste this link into the source code of your staging environment. By clicking this link, you will launch Blisk with the specified device set and Url.
Notice:
Blisk link will not work without installed Blisk URL Handler - ask your teammates to install it when your share Blisk link with your team.
Blisk link will not work without installed Blisk URL Handler - ask your teammates to install it when your share Blisk link with your team.
Notice:
You can share the link with your team to use the same development environment. This feature is supported with Blisk v.16 and later. Your teammates may need to update Blisk to use this feature.
You can share the link with your team to use the same development environment. This feature is supported with Blisk v.16 and later. Your teammates may need to update Blisk to use this feature.
Chrome extensions
You can use your favorite Chrome extensions in Browsing mode - Blisk supports extensions smoothly. While some extensions work in Developer mode, the extensions in Developer mode are not officially supported due to conflicts with multiple device contents.
Tools
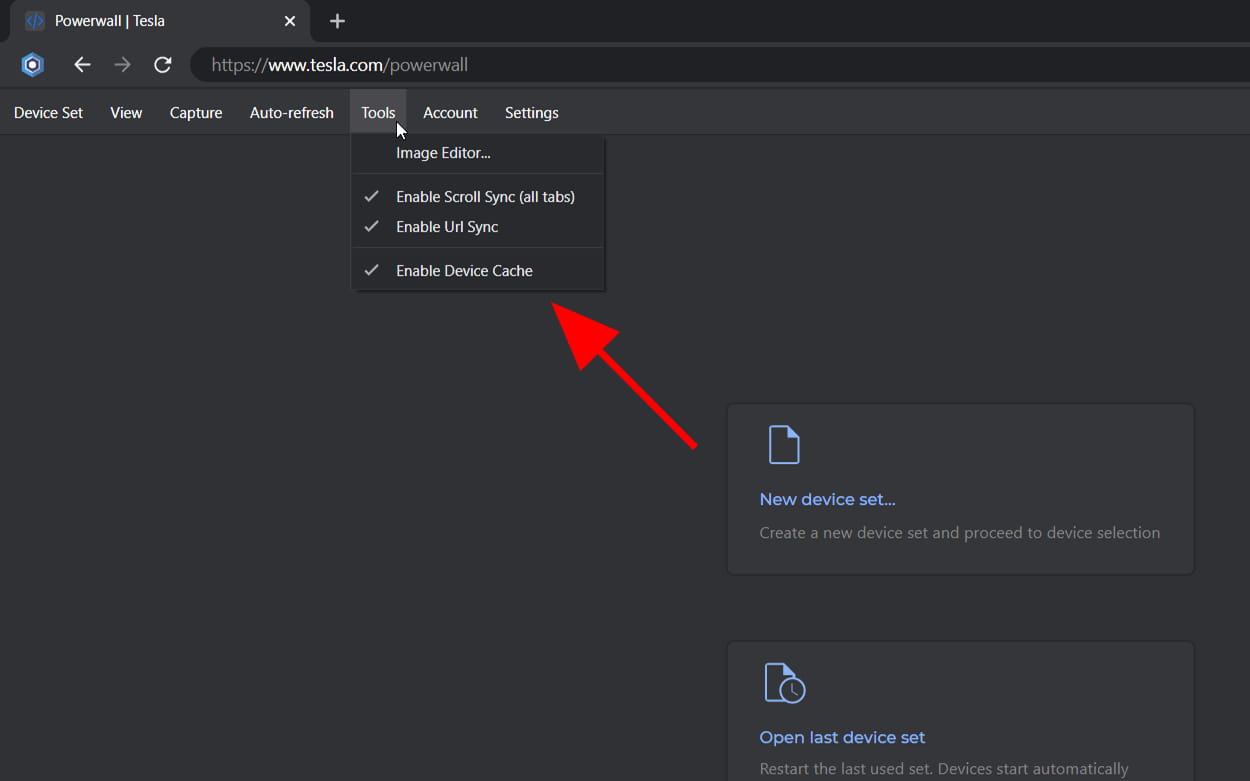
Tools Menu
Use Menu ➜ Tools to use extra features, like Image Editor, to manage URL Sync, Scroll Sync, and Device Cache. This menu item has the following options:
- Image Editor - use this feature to annotate screenshots and images (you can draw text and shapes on top of the picture). By default, Blisk starts Image Editor after taking a screenshot. If you want to skip Image Editing - click Menu ➜ Capture ➜ Capture Settings and change the setting.
You can start Image Editor from Menu ➜ Tools ➜ Image Editor independently, select an image from your local folder, and use this tool to annotate an image. - Enable URL Sync - use this feature to enable and disable URL Sync. To learn more about URL Sync, see the URL Sync section.
- Enable Scroll Sync - use this feature to enable and disable Scroll Sync. To learn more about Scroll Sync, see the Scroll Sync section.
- Enable Device Cache - click this menu item to enable or disable the Caching of resources (e.g. CSS, JavaScript, images, etc) in devices.
Settings
Use Menu ➜ Settings to control Blisk features, to customize the look and feel of Blisk application. Within Settings, you may control Developer Mode, Home Page, Theme, Auto-refresh, Device Sync, and Captures.

Settings Menu
Troubleshooting
Please follow the steps in case you have issues with Blisk:
- Check if you're using the latest version:
- Launch Blisk and check your current version on the Home page.
- Go to the official website and check the latest version.
- Update your version of Blisk when the new version is available.
- Contact Blisk support:
- Navigate to Contact page and describe the steps to reproduce the issue.
- Reset Blisk to default settings:
- Launch Blisk and open the Home page.
- Click Reset settings from the Customize section.
- Relaunch Blisk application.
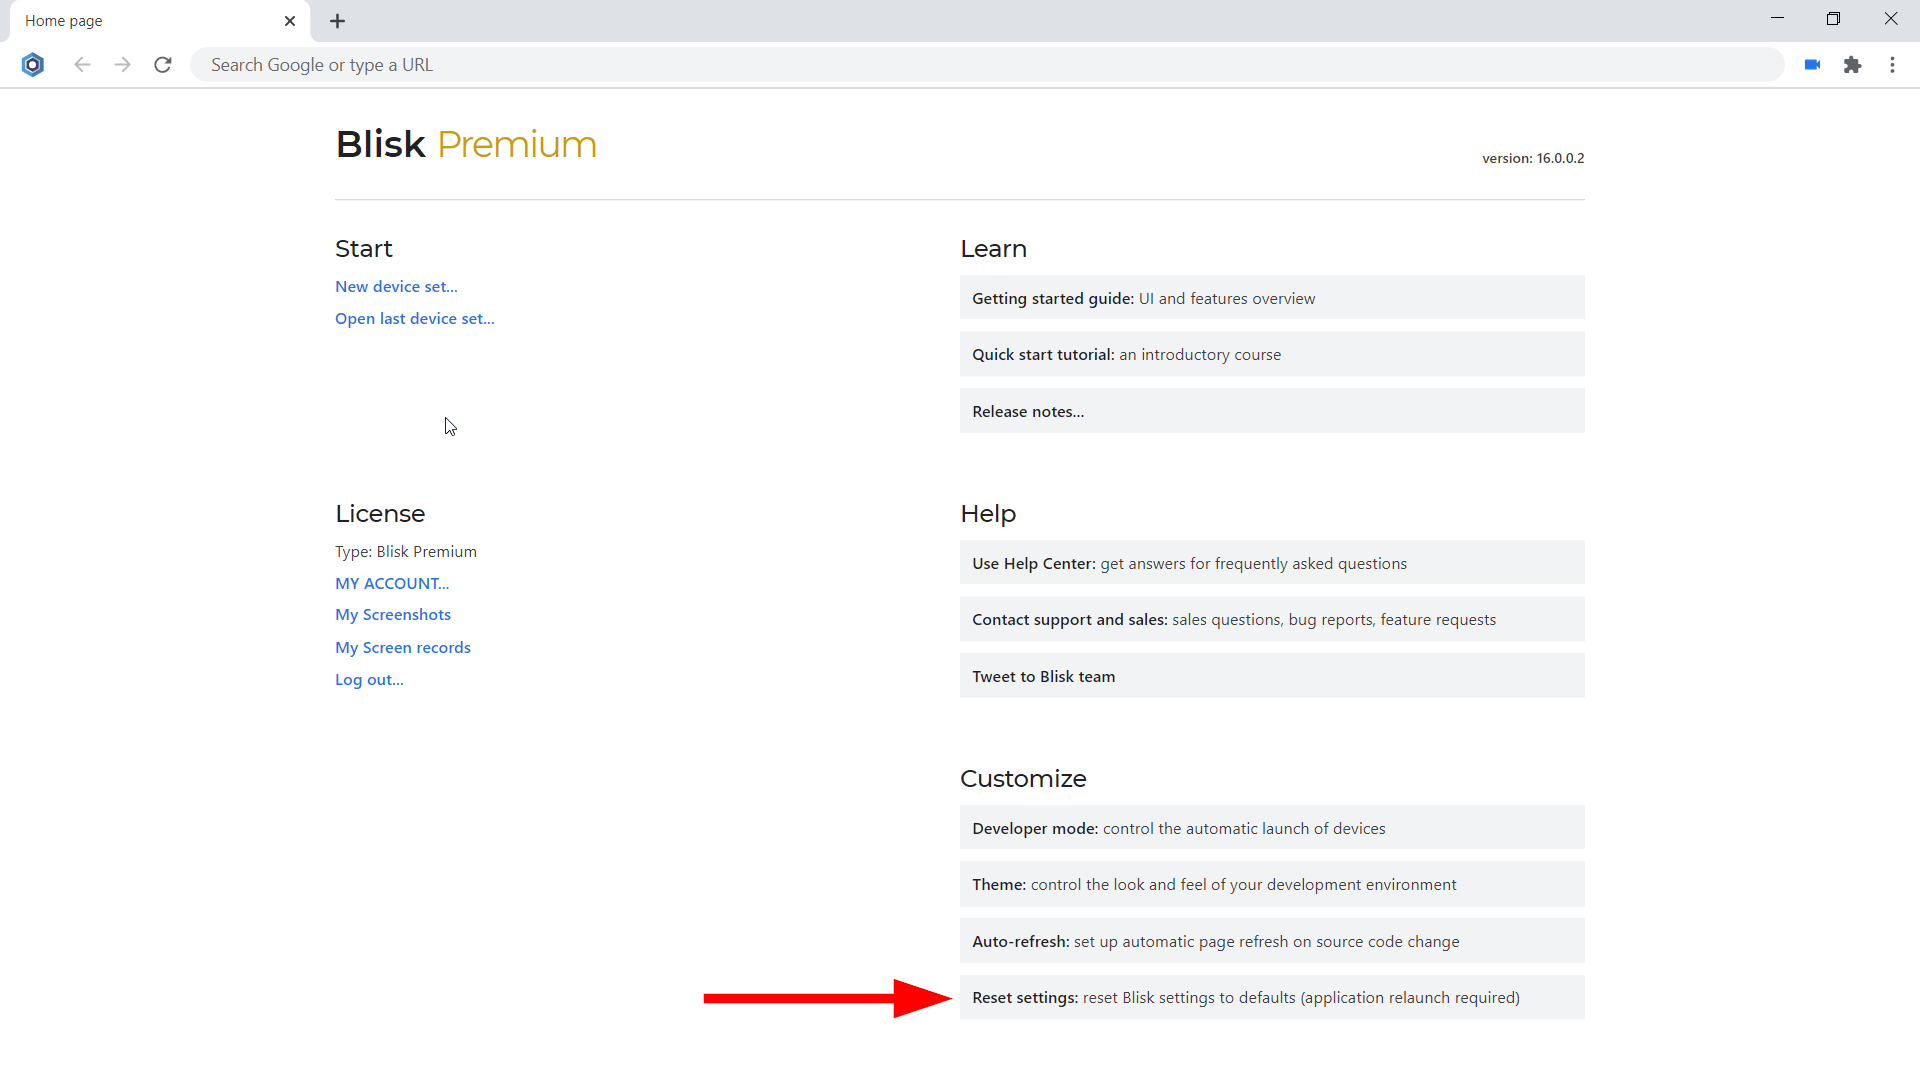
Reset Blisk Settings
Learn the basics of using Blisk:
Learn more about Developer Mode, Development Domain, and Device Manager on Blisk Documentation.
Article tags:
BliskUser interfaceDevice usageAuto-refreshURL and Scroll syncScreenshotsScreen recorderNotifications